Epoxy Vacuum Infusion Explained

Overview
If epoxy vacuum infusion were a superhero, it’d be the quiet one who shows up, puts everyone into compression, and leaves the boat lighter, stronger, and smelling only faintly of solvent. In plain terms: very heroic. Composites can glaze people over faster than a fiberglass fairing, but stick with me—this process turned boatbuilding from artisanal guesswork into repeatable, industrial‑grade predictability.
What is epoxy vacuum infusion?
Vacuum infusion (aka VARTM) is a closed‑mold process where dry reinforcements and any core are placed in the mold, the whole assembly is sealed under a vacuum bag, air is removed, and low‑viscosity epoxy is drawn into the laminate through distribution media. The vacuum does the heavy lifting: it pulls infusion epoxies through the flow medium, wets the fibers, and consolidates the laminate with fewer voids and a more consistent fiber content.
Why it matters
Higher fiber‑to‑resin ratio equals lighter, stiffer parts; fewer voids mean better long‑term strength and less osmotic heartbreak; closed‑mold infusion reduces VOCs and improves shop safety. Translation: better boats and far fewer headaches. Bottom line: epoxy vacuum infusion is the productivity‑and‑quality cheat code for modern composite hulls.
Why epoxy (not polyester)?
Short version: epoxy is simply better for structural marine parts. Epoxy bonds to cores more reliably, offers higher tensile and fatigue strength, and resists water ingress far better than polyester or vinylester. Modern infusion epoxies are engineered for very low viscosity and controlled exotherm and gel time, so you can wet out big or complex molds at room temperature without baking your part into a gooey oven.
Practical note: vinylester and polyester still exist for cost reasons, but if you’re integrating batteries, mounting hardpoints, or squeezing range out of an electric hull, epoxy’s adhesion and long‑term durability pay off. Epoxy costs more upfront but saves mass, increases safety, and improves lifecycle value—especially for electric boats.
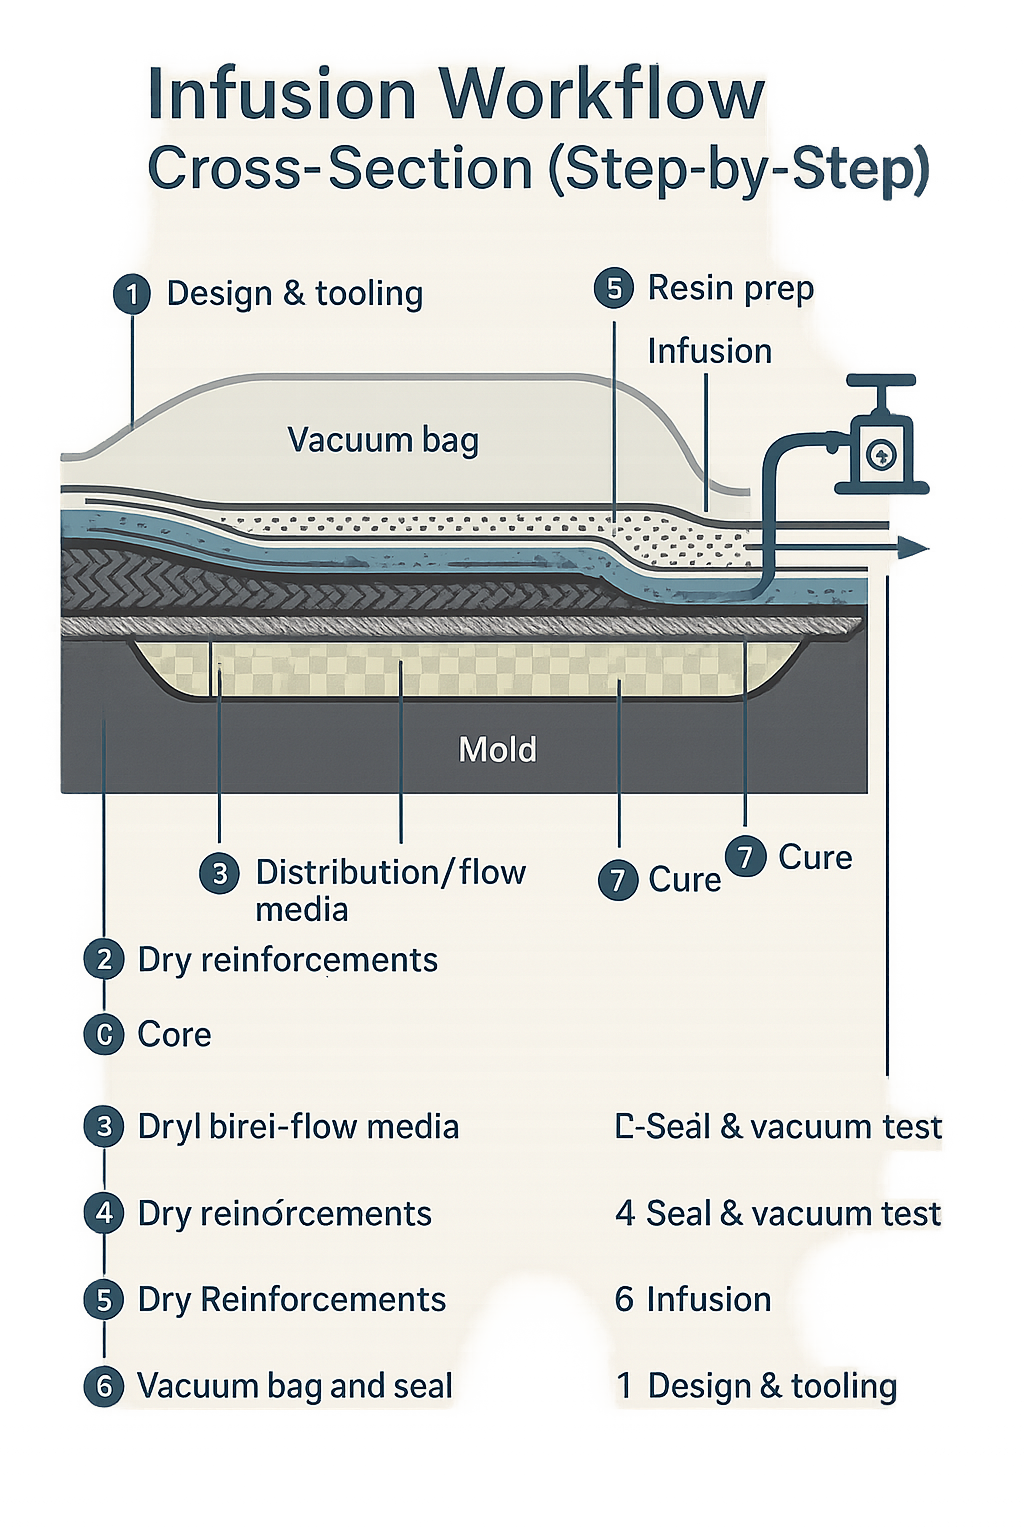
Step‑by‑step: the infusion workflow
Takeaway for the impatient: plan the flow before you touch the fiber—design is about 90% of a successful infusion.
1. Design & tooling
- Confirm laminate schedule and core locations.
- Plan resin inlets, vents, distribution media, and flow paths.
- Verify mold surface and release systems are clean and tested.
Takeaway: design the flow before you touch the fiber—planning is ~90% of a successful infusion.
2. Layup dry materials
Place fiberglass, carbon, or hybrid fabrics and cores exactly where they belong; pre‑tack or stitch if needed.
Takeaway: a sloppy dry layup makes a sad wet part later.
3. Peel ply & flow media
Add peel ply adjacent to the laminate; position distribution/flow media and bridging layers to guide resin.
Takeaway: flow media is your resin highway—build it wisely.
4. Seal & vacuum test
Bag, seal, and pull vacuum (typical working range ≈ 26–29 inHg, about −0.85 to −0.98 bar). Run a 15–30 minute leak test.
Takeaway: if the bag doesn’t hold vacuum for 15 minutes, fix it—don’t improvise during infusion.
5. Resin prep
Mix the infusion epoxy per the tech data sheet, control temperature (warmer → lower viscosity), and degas if recommended.
Takeaway: resin prep is chemistry class with deadlines—get it right or the flow front will remind you.
6. Infusion
Open the resin feed under vacuum, watch the flow front, and close vents as they’re reached.
Takeaway: monitor it like a tense movie scene—flow fronts don’t wait for coffee breaks.
7. Cure & consolidation
Maintain vacuum during initial cure; consider a post‑cure for Tg and mechanical properties as recommended.
Takeaway: patience pays—a controlled cure beats a rushed, overheated disaster.
8. Demold & finish
Remove bagging, peel ply, and flow media; trim and fair.
Takeaway: post‑process finishes make the part usable and pretty—don’t treat them like an afterthought.
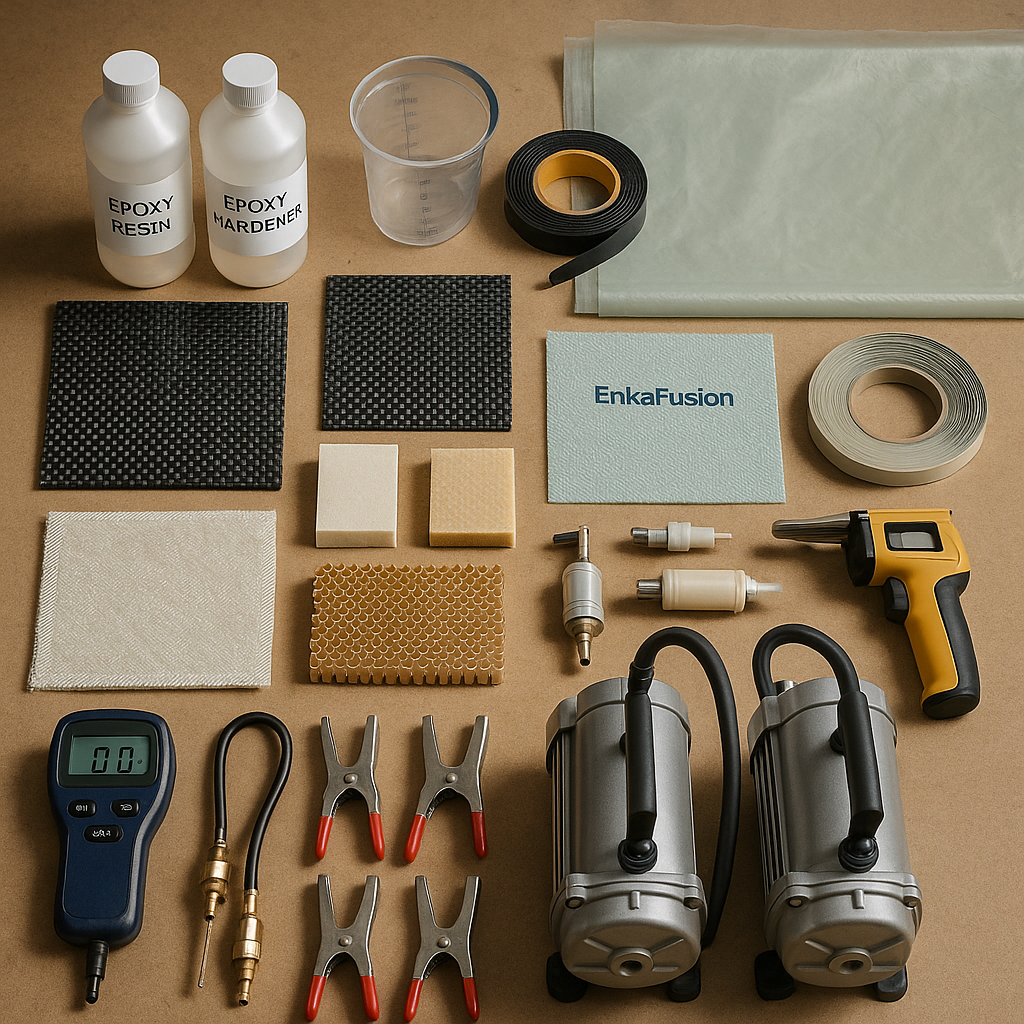
Materials & tooling you’ll actually need
- Infusion‑grade epoxy (low viscosity, controlled exotherm).
- Reinforcements: fiberglass, carbon, or hybrid fabrics.
- Core options: balsa, PET/SAN foams, or Nomex honeycomb.
- Flow media (e.g., EnkaFusion, Divinymat), peel ply, distribution mesh.
- Vacuum bag film, tacky tape, redundant vacuum pump(s), digital vacuum gauge/logging.
- Resin pots, hoses, traps/filters, clamps, thermocouples or IR thermometer.
Pro tip: big parts deserve backup pumps and a clear fallback if a pump dies mid‑vacuum. Invest in reliable gear and spares—downtime and ruined infusions are costly.
Infusion strategies and flow control
- Balance shortest flow paths; place inlets opposite outlets and use distribution media to equalize flow.
- Multi‑inlet sequencing (progressive closing) works well for very large molds.
- Controlled Vacuum Infusion (CVI) actively modulates vacuum and feed to control compaction and flow speed—handy for thick laminates or sandwich panels.
Tools for visibility: flow‑front markers, small transparent bag strips, cameras, or clear observation windows. Treat resin like a skittish animal—coax it, don’t force it.

Troubleshooting, quality control & Lumen Yachts application
Common problems and fixes
- Dry spots: usually bad inlet placement or insufficient flow media. Fix by redesigning distribution, adding inlets, or carefully warming resin to lower viscosity (only if safe).
- Vacuum leaks: often tack tape or bag wrinkles. Fix with longer leak tests, silicone backup tape, or local repairs.
- Starving areas: resin reaches outlet too quickly—add restrictors, use smaller tubing, or rethink inlet positions.
- Excessive exotherm or premature gel: too much resin mass, high ambient temp, or too‑fast hardener. Fix by choosing lower‑exotherm systems, reducing run size, or cooling resin/ambient temps.
Takeaway: every failure is a troubleshooting checklist—learn and document.
Quality control & testing
- Void content via micrography or ultrasonic scans.
- Bond tests to cores (peel or pull‑off).
- Dimensional checks and weight verification.
- Long‑term monitoring for osmotic blisters or water ingress in hull laminates.
Pro yards keep tight documentation—material lot numbers, pump traces, and crew notes—so you can trace issues later. Test like you mean it; document like your warranty depends on it.
Real world examples
Saare Yachts: consistent saturation in complex hulls using infusion methods. Superyacht projects: multi‑meter hulls scaled with infusion. Shipyards and manufacturers showing infusion saves time and improves consistency at production scale. Suppliers like TotalBoat, PTM&W, and Fibre Glast offer practical trials and product guidance for infusion epoxies and consumables.
Takeaway: from tenders to megayachts, vacuum infusion scales with the right planning.
Why Lumen Yachts chooses epoxy vacuum infusion for our 10 m electric boats
At Lumen we prioritize low weight, predictable stiffness, and safe battery integration. Epoxy infusion lets us:
- Cut hull/deck mass without sacrificing stiffness—more range per kWh.
- Produce repeatable laminates that make battery boxes, stringers, and hardpoints reliable.
- Lower emissions in the shop and improve worker safety compared to open lay‑up.
The result: a 10 m electric boat that handles predictably, achieves better range, and comes from a cleaner production process. Infusion isn’t just shiny tech—it directly improves metrics owners care about: range, durability, and serviceability.
Getting started: practical recommendations
- Start with a small trial panel to learn sealing, flow, and cure profiles.
- Use infusion‑specific epoxy systems and follow tech data for viscosity, pot life, and Tg.
- Invest in a reliable vacuum pump and a good digital gauge (logging recommended).
- Document every run: ambient & resin temps, vacuum trace, and flow times.
If you want, I can turn this into a printable checklist for your first panel or a Lumen Yachts technical brief on our 10 m laminates and battery integration.
Key takeaways
- Epoxy vacuum infusion produces lighter, stronger, and more consistent laminates than open lay‑up.
- It reduces VOCs and improves shop safety—good for the planet and your team.
- For electric boats, infusion optimizes stiffness‑to‑weight and enables reliable battery integration.
- Start small, document everything, and choose infusion‑grade resins and reliable pumps.


